Overview
Time entry is a core process in InFocus. Entered by each employee and/or consultant, timesheets have a direct impact on project reporting and utilization. The Timesheets applet gives you the tools you need to record time quickly and accurately.
Note Time entry is also available for web/mobile via InFocus Mobile.
Timesheet Workflow
Timesheet Created
Timesheets are created by your timesheet admin based on a Weekly, Bi-Weekly, Semi-Monthly or Monthly time cycle. Timesheets are generally created for a Timesheet Group. Alternatively, you can create a timesheet for a single employee (typically used when hiring a new employee mid-time cycle, for example).
Timesheet Entered & Submitted
Once created, you’ll enter and submit time via Personal>Timesheets. Time, while typically entered by each employee and/or consultant, can optionally be entered on behalf of an employee and/or consultant by a timesheet administrator.
Best Practices
| • | Enter your time on a daily basis. This will ensure your time impacts project reporting and planning as close to real-time as possible. |
| • | Save your timesheet while entering |
| • | Use helpful tools like Add Recent Projects, Add Scheduled Projects, Timer, etc |
| • | Ensure your timesheet is complete before submitting. Once submitted, you cannot make edits unless enabled by your timesheet approver. |
Other Considerations
| • | Work Orders - When utilizing this feature, work orders can be assigned to an employee and include much of the info (Project Path, Job Title, etc.) necessary to fill out the timesheet line, except for hours and date. This frees employees from having to know Project Paths and contractual or billing information. |
| • | Estimate to Complete - When using this feature, employees must enter an estimate to complete before submitting timesheets that contain hours against Projects or Work Orders flagged with this requirement. Enable this feature via Administration>Global Settings>Time & Expense tab. |
Timesheet Review
Submitting your time, notifies your time approver for review. If approved, your timesheet is sent to Accounting for billing. If rejected, you’ll receive your timesheet back for edits.
Once approved, timesheets can be reviewed and adjusted for billing. Completed via Human Resources>Timesheet Adjustments, Accounting has full control over the recorded time to adjust as needed for the final bill.
Administrative Note
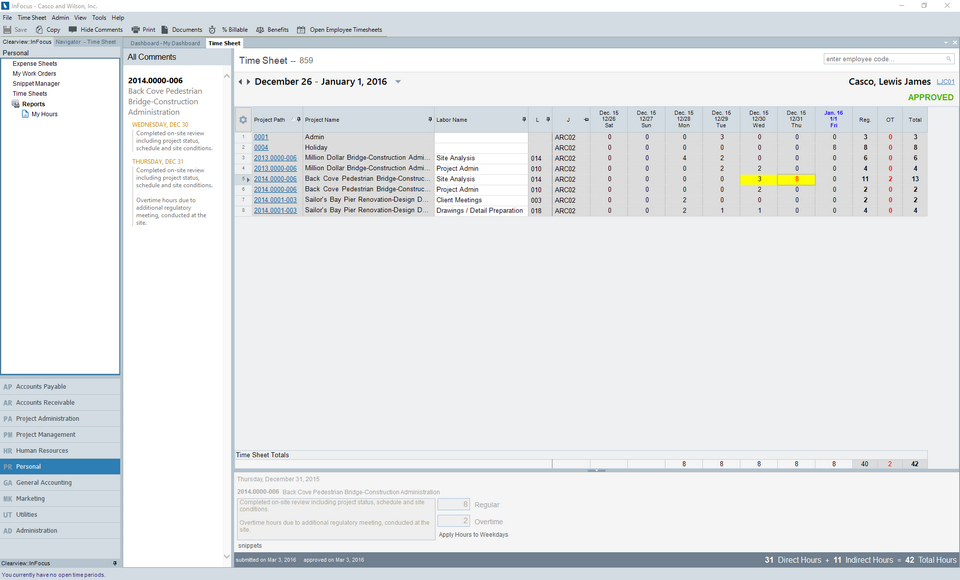
Upon timesheet approval, InFocus takes a snapshot of the original timesheet. This means that when viewing the approved timesheet in the Timesheets applet, the originally approved time is displayed- regardless of adjustments made for billing.
After the appropriate adjustments, time is billed.
Timesheet Tutorials
Creating Timesheets
Timesheets can be created for a Timesheet Group or for an individual Employee.
Create a Timesheet for a Group
| 1. | Browse to Personal>Timesheets |
| 2. | Select Admin>Timesheets>Create Timesheets for a Timesheet Group |
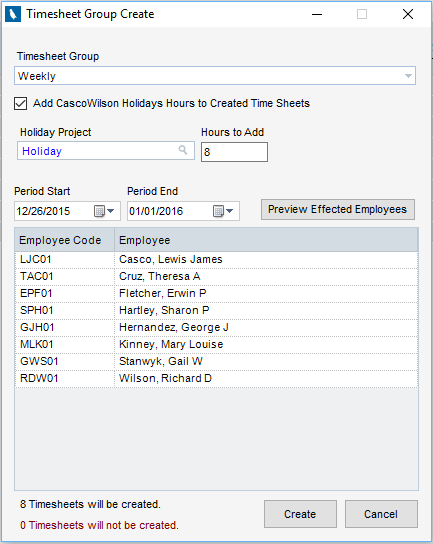
| 3. | From the dialogue that appears, select the Timesheet Group and set the Periods. Note: You can optionally add pre-filled Holiday Hours to the timesheet based on a Holiday Calendar. Holiday calendars are managed via Human Resources>Holiday Calendar and assigned to timesheet groups via Personal>Timesheets>Admin Menu>Timesheet Groups. |
| 4. | Click Preview affected Employees to ensure all intended employees will have a timesheet created |
| 5. | Click Create |
A timesheet will be created for each employee listed in Preview list.
Create a Timesheet for an Employee
| 1. | Browse to Personal>Timesheets |
| 2. | Load the Employee you wish to create a timesheet for via the Employee Lookup |
| 3. | Select Admin>Timesheets>Create Employee Timesheet |
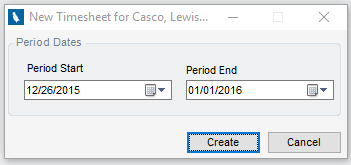
| 4. | From the dialogue that appears, select the Start and End Dates for the timesheet. |
| 5. | Click Create |
A timesheet will be created for the loaded employee.
Entering Time
| 1. | Browse to Personal>Timesheets |
| 2. | Select the period for which you wish to enter time. This can be accessed via the drop down to the right of the Period label or by navigating timesheets with the arrows to the left. |
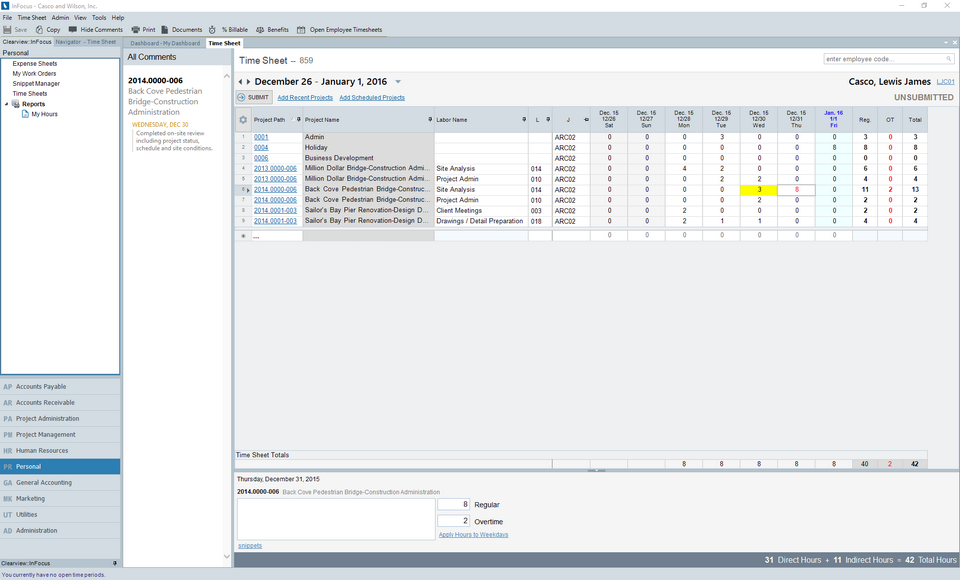
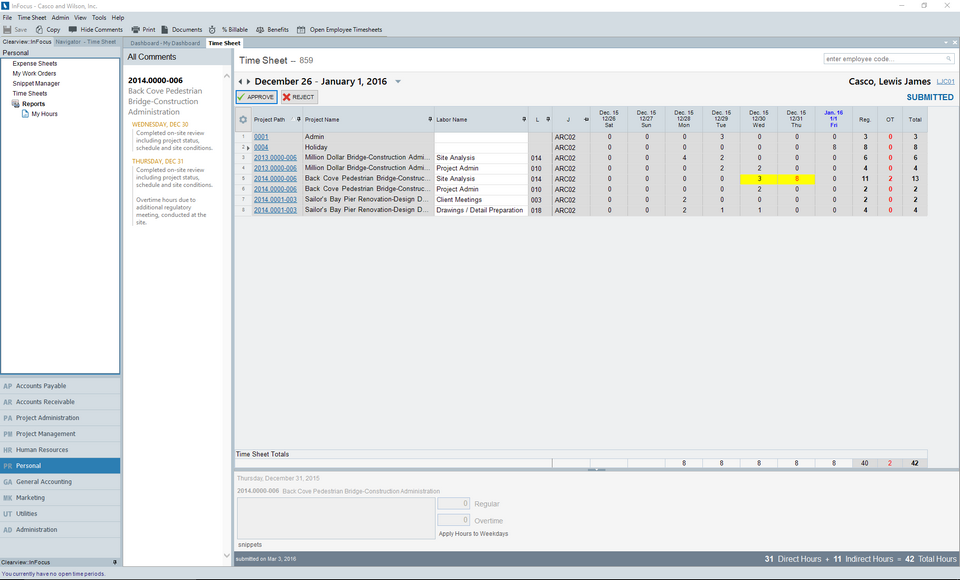
| 3. | Enter your time. In short, your timesheet consists of the hours you worked on specified projects. Hours can be further defined by Job Tile and Comments (and optionally by Labor Code, Location, Bill Status and/or Work Order). |
Selecting a Project
Projects are specified via the Project Path. Simply begin typing the path (ex. 20140000-001) and InFocus will dynamically search for a match. You can also click the magnifying glass to search or select a recently used or scheduled project by clicking Add Recent Projects or Add Scheduled Projects.
Comments
Comments are added on a per-entry basis via the Comments box beneath the timesheet grid or by typing “c” while in the timesheet grid. Once entered, you can apply the comment to all entries for the specified project for the timesheet by clicking Apply Hours to Weekdays, found below the timesheet grid or via the Comments dialogue (launched by typing "c" from the timesheet grid). Entries with comments are highlighted yellow in the timesheet grid.
If you use boiler-plate comments for certain types of time, you can create a snippet for quick reference via the snippets link below the comments box. Reuse your snippets by clicking the link and inserting the previously created snippet.
All comments for your timesheet can be viewed by clicking Show Comments from the toolbar or by hovering over the cell in the timesheet grid.

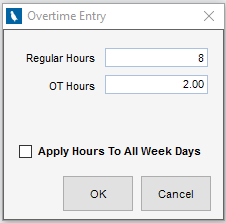
Overtime
Overtime is designated as a part of the total time entered on a given project/day. For example, if you worked 8 hours on a given project and 2 of the hours were considered Overtime, you would enter the 10 hours in the timesheet grid and then designate the break out via the Regular and Overtime boxes below the timesheet grid or via the Overtime Entry dialogue, launched by typing “o” from the timesheet grid. Saving the entry publishes the breakout: 8 hours on the day and 2 hours to the Overtime column for the week.
Apply Hours/Comments to Weekdays
This link is found below the timesheet grid and in the Comments and Overtime Entry dialogues. When checked, InFocus will apply your comment and/or hours to each day in the week for the entered Project.
| 4. | Save your timesheet as you enter by clicking Save from the toolbar |
| 5. | If needed, you can delete rows by highlighting the row (click the far left number column) and click Delete. |
| 6. | Submit the timesheet by clicking Submit. Timesheets can also be submitted via the Timesheet Menu option. Once submitted, the timesheet status will reflect the submission. If approved, the status will be updated to Approved. If rejected, the status will reflect Rejected and include a reason for rejection. |
Note: If any Estimates to Complete are required, a list will appear where the user can enter an estimate of remaining hours or, optionally, flag the item as complete
Approving/Rejecting Time
| 1. | Browse to Personal>Timesheets |
| 2. | Click Open Employee Timesheets from the Toolbar and select the timesheet you wish to review |
| 3. | Click Approve or Reject as appropriate (this can also be done via the Timesheet Menu). If rejecting, provide instructions for the employee as appropriate- the instructions will appear on the user's timesheet for their review/correction. |
Timesheet Field Descriptions
Below is a discussion of Timesheet Field Descriptions.
Timesheet Toolbar
The Timesheets toolbar gives the user (with appropriate permission) various capabilities within the Timesheets applet of InFocus. Those capabilities are as follows:

Menu Options
| • | Timesheet>Submit - Submits the loaded timesheet |
| • | Timesheet>Approve - Approves the loaded timesheet |
| • | Timesheet>Reject - Rejects the loaded timesheet. You'll be prompted for a rejection reason if required via Administration>Global Settings>Time and Expense tab. |
| • | Admin>Modify Current Timesheet Period - Launches a dialogue where the period can be altered by shifting the entire time entry period based on an anchor date, or altering the Start Date or End Date only. |
| • | Admin>Timesheet Groups - Launches a dialogue for managing Timesheet Groups |
| • | Admin>Timesheets - Allows you to create a timesheet for an individual Employee of for a Timesheet Group |
| • | Admin>Delete Current Timesheet - Deletes the loaded timesheet |
| • | View>Billable Percentage - Shows the billable percentage |
| • | View>Missing Timesheets - Shows employees who haven't submitted their time for a specified Period End Date. |
| • | View>Benefits - Displays a summary of benefits for the loaded employee |
| • | Tools>Compress Timesheet Lines - Merges timesheet lines that contain like information (Projects+Labor code+Bill Status+Job Titles+Work Date+Work Order+PM Comments+Location+Comment Templates+Overtime Type) |
Toolbar Options
| • | Save - Saves the currently loaded timesheet record |
| • | Copy - Copies the currently loaded timesheet record and pastes to another timesheet specified via the Timesheet Copy. Copies can optionally include Hours and Comments. You can only paste to previously created Timesheets. |
| • | Show Comments - Shows a listing of all comments entered on the loaded timesheet. Once clicked, this button will read Hide Comments (click to hide the comments pane). |
| • | Print - Runs the Timesheet report for the loaded timesheet |
| • | Documents - Use this to load documents to your timesheet |
| • | Timer - Adds a Timer column to the Timesheet Grid. Clicking the timer column for a specified project's row starts the timer. Clicking the running timer again, stops the timer and fills in the time value for the day. |
| • | % Billable - See View>Billable Percentage above |
| • | Benefits - See View>Benefits above |
| • | Open Employee Timesheet - Provides you with a list of Employee timesheets to load for timesheet review and/or entry |
Timesheet Navigation & Statuses

| • | Timesheet ID label - Internal ID of the timesheet record |
| • | Employee Lookup - Used by administrators to load a timesheet for review or entry on behalf of an employee |
| • | Left/Right Arrows - Use these arrows to browse timesheets |
| • | Timesheet Dates - Indicates the Start and End dates of the loaded timesheet. |
| • | Down Arrow - Click to browse timesheets via a drop down list. Load a timesheet from the list by double clicking. |
| • | Submit - Click to submit your timesheet |
| • | Approve - Visible by timesheet approvers once the Timesheet has been submitted, Click to Approve the timesheet. |
| • | Reject - Visible by timesheet approvers once the Timesheet has been submitted, Click to Reject the timesheet. |
| • | Add Recent Projects - Displays a list of projects on which the employee has recently worked. The employee checks off which projects to apply to the current timesheets. Projects the employee has worked on in the last 30 days are considered Recent Projects. By default, projects are sorted in descending order by the last day on which they were worked. |
| • | Add Scheduled Projects - Displays a distinct list of scheduled projects based in the supplied date range. The employee checks off which projects to apply to the current timesheets. |
| • | Employee Label - Reflects the employee associated with the loaded timesheet |
| • | Status Label - Reflects the current status of the timesheet: Unsubmitted, Submitted, Approved, Rejected |
| • | Rejection Reason - If a timesheet has been rejected, the status will reflect accordingly and the rejection reason will be displayed. |
Timesheet Grid
Grid Fields
The timesheet entry grid displays fields available to enter as a part of your timesheet. Additional fields can be added/removed from the detail using the column chooser (gear icon) in the upper left of the detail grid. All fields can be reordered in the grid.
The timesheet grid, specifically, allows you to pin a column (much like freezing a column in Excel). To do so, click the Pin icon contained in the column header. Below is a list of available grid and standard fields listed alphabetically.
| • | Days of the Week Columns - Regular hours (non-overtime) worked for the Project on a given day |
| • | J (Job Title) - Job Title associated with the time record. List shows the allowable Job Titles for selection based on associated Rate Schedules, Project Membership and/or Employee Job titles. |
| • | L (Labor Code)** - Labor Code associated with the time record |
| • | LOC (Location)** - Location of the time record |
| • | OT - Total overtime hours for line item |
| • | Project Path - Project the transaction is being entered against. Only allowable projects can be used. An allowable projects is determined by a Project Active Flag, Timesheet Allow Date Entry, Profit Center Membership, and (potentially) a Project Team Membership list. The lookup for this field is split into two sections. The top section is used to select a Bill Terms Node (project). Once selected, the bottom section lists the allowable WBS nodes. |
| • | Reg - Total regular hours for line item |
| • | S (Bill Status)** - Bill Status of the time record |
| • | Total - Total hours for line item |
| • | Work Order** - Work Order time is being entered against. When a Work Order is used, the project (WBS) path, the labor code, and the job title will fill out automatically. The project cannot be overridden. |
** Please note, some fields listed below are only available if allowed via Administration>Global Settings>Time & Expense tab.
Standard Column Fields
Fields can be selected using the column chooser (gear icon) in the upper left of the detail grid
| • | Client Code - Client Code associated with the line items (via the Project) |
| • | Client Name - Client Name associated with the line items (via the Project) |
| • | Labor Name** - Labor Name associated with the line item (via the Labor Code) |
| • | Location Code** - Location Code associated with the line item (via the Location selection) |
| • | Location Name** - Location Name associated with the line item (via the Location selection) |
| • | OT Hours** - Adding this adds an OT entry column for each day in the timesheet |
| • | Project Name - Project Name of the project associated with the line item |
** Please note, some fields listed below are only available if allowed via Administration>Global Settings>Time & Expense tab.
Timesheet Totals
Timesheet Totals gives you at-a-glace information for the timesheet, including a summarized column, details for the highlighted cell and a timesheet summary.

Timesheet Details
| • | Date Label - Reflects the date of the highlighted cell |
| • | Project Path Label - Reflects the project path of the highlighted cell |
| • | Comments Box - View and/or Edits comments for the highlighted cell |
| • | Snippets - Launches the snippets dialogue for entering/adding common comments to the highlighted cell |
| • | Regular - View and/or Edit the Regular Hours associated with the highlighted cell |
| • | Overtime - View and/or Edit the Overtime Hours associated with the highlighted cell |
| • | Apply Hours to Weekdays - Copies the hours from the highlighted cell and pastes them into all weekdays in that row |
Timesheet Summary
Timesheet Summary gives you at-a-glace summary for the loaded timesheet.
| • | Submitted Label - Date of submission |
| • | Approved Label - Date of approval |
| • | Direct Hours - Hours entered against billable projects |
| • | Indirect Hours - Hours entered against non-billable projects |
| • | Total Hours - Total direct and indirect hours |