Overview
How to Add Report Parameters to Custom Reports.
Parameters are a powerful aspect of reports that are necessary to take a report to the next level.
Note: Many of the project related custom reports are designed with project leader security. Project Accountants can see all projects. Principals-In-Charge can see projects where they are the principal or project manager. Project Managers can see only projects where they are the project manager. Employees with no job type in their employee setup cannot see any projects. If you wish to allow a user to see all projects regardless of their job type make a copy of the report. In the copied report click on Manage Report parameters. In the parameter list click on the parameter ^myid^. You will notice that this parameter is marked hidden. Change the default value from @MYID@ to -1.
Step 1 - To access the parameters of the report, click the button Manage Parameters (See Fig. 7)

Fig. 7
This will bring up the Manage Parameters window. (See Fig. 8)
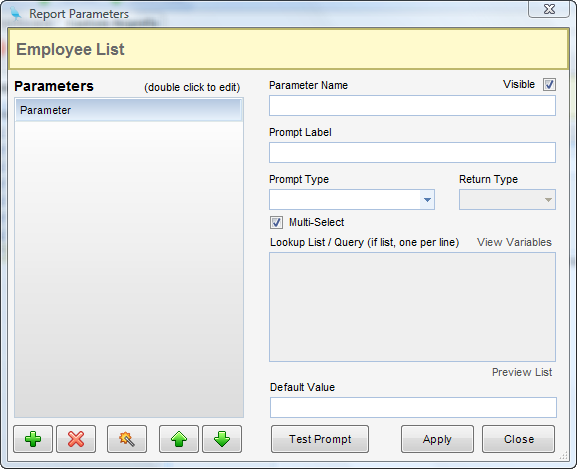
Fig. 8
![]() -Add Parameter - Use this to add a parameter.
-Add Parameter - Use this to add a parameter.
![]() - Delete Parameter - Use this to delete the selected parameter
- Delete Parameter - Use this to delete the selected parameter
![]() - Auto-Detect Parameters – This will scan the query or stored procedure to find parameters. Note: this will erase any already specified parameters.
- Auto-Detect Parameters – This will scan the query or stored procedure to find parameters. Note: this will erase any already specified parameters.
![]() - Sort Options. This will order the parameters. Generally, order is not important, except when using cascading parameter lookups.
- Sort Options. This will order the parameters. Generally, order is not important, except when using cascading parameter lookups.
Parameter Settings
| • | Visible - If you do not want the user to be able to change the value of a parameter, give it a default value and make it invisible. |
| • | Name - This is the name of the parameter. All parameters must be in the format ^somename^ |
| • | Label - This is the text that will appear on the prompting screen. |
| • | Type - This is the data type of the parameter. There are three classes of parameter types. |
1) SQL – these are the standard SQL data types (i.e, int, varchar, datetime, etc…)
2) InFocus – This allows the user to look up standard InFocus objects, such as employees, projects, vendors, etc. When using InFocus types, specify which property of the object should be returned to the query, such as ID, Code, Path, Name.
3) List – Lists can be either manually written or a sql query. When using the sql query list, the query can return as many fields as you want, but it MUST have at least two, specifically named DisplayText and DisplayValue. DisplayText is what the user will see in the drop down. DisplayValue is the value that is supplied to the query.
If the List/SQL is optional, that means the drop-down is more of an aid than a requirement. The user can type in any value.
| • | Multi-Select - A list can be specified as multi-selected when the type of parameter is either a List or SQL. |
| • | Lookup / List - Either the manual list or the SQL query for the List/SQL type is located in this textbox. |
| • | Default Value - This allows you to have a parameter contain a default value within the prompt. |
Note - Additionally, all parameters are sent to Report Design as Report Parameters. This allows the user to create conditional parameters, such as Show Detail, and then to optionally show or hide items in the report design.
Adding Parameters to the Employee List Report
In this sample report for Creating a New Custom Report, no parameters were specified. To add a parameter named ^empid^, give the parameter a default value using a system variable @MYID@, which is the employee ID.
This parameter will be used to limit the result of the query to only those employees for whom the user is the time approver.
Step 2 - Change the query from:
select empcode, empname from employees order by lastname
Change the query to:
select empcode, empname from employees where TimeExpApproverEmpID=^empid^ order by lastname
Click the Manage Parameters button.
Use the Auto-Detect ![]() button to find the new parameter.
button to find the new parameter.
Step 3 - Once found, double click the parameter to look at its settings. (See Fig. 9)

Fig. 9
Change the Prompt Label to “Employee”.
Change the Prompt Type to "Employee" and the Return Type to "ID".
Enter @MYID@ in the Default Value.
The screen should now look like Fig. 10

Fig. 10
Click the Apply button.
Click the Close button.
Step 4 - Now that the query has been changed, the previously generated RDL must be made aware of the new parameter. This can be done in two ways. The first way is to regenerate the report because the design has not been customized. The second way is to use the Update RDL Dataset(s) & Parameters button. For this example, the second method will be used.
Click the Update RDL Dataset(s) & Parameters button.
Preview the report.
A prompt will appear with the user’s name already filled in.
Note: The name can be changed to look up the employees for anyone. Uncheck the Visible option to allow users to see only their own approver list.